Raise the bar on your watering system with drip tape, and an amazing GIVEAWAY!

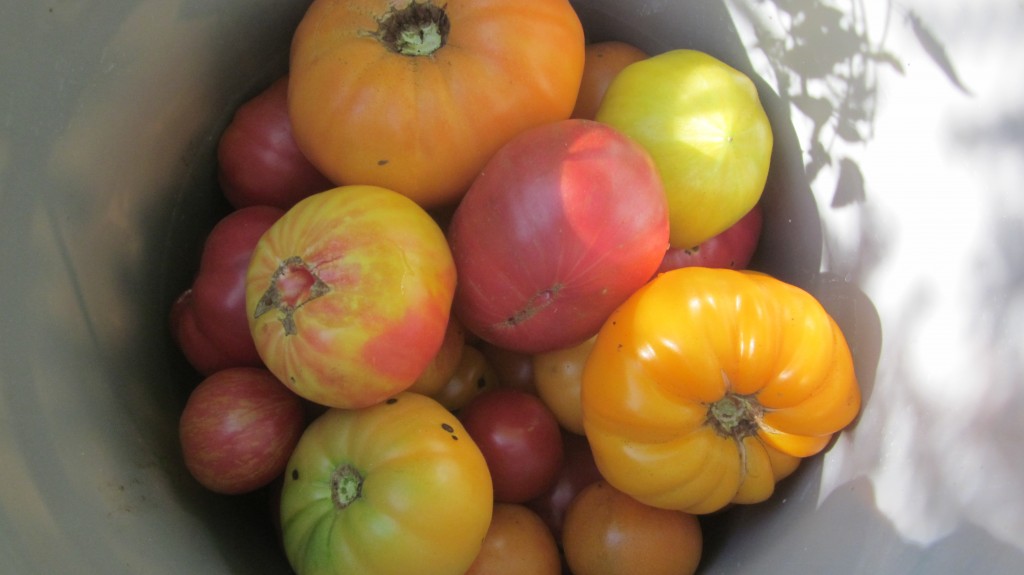
I plant a lot of heirloom tomato plants, as you know, Gentle Reader. A lot of tomato plants. For years, even, I’ve refused to divulge how many I plant because I tend to make people shoot milk (if they are drinking milk) or soda (if they are drinking soda) or bulletproof coffee (you get the drill) out of their noses in astonishment when I tell them, because I plant so dadgum many.
Just picture it: A Person and I are conversing about tomatoes. “How many do you grow?” The Person asks, sensing that heirloom tomatoes are a bit important to me. I tell him the number, not anticipating what will happen next. I jump back as first he chokes, shoots stuff through his nose (as already indicated) then watch as his eyes grow very, very wide, and then he shakes his (proverbial) head, and after all that, he asks, in a hoarse, unbelieving voice: “Why on earth would anybody plant that many tomato plants . . . ?”
So. That’s what happens. *snif* Being a sensitive gardener, after witnessing a few of these annoying reactions, I just. stopped. tellin’. So don’t ask me. Just know that it’s more than a dozen. 🙂 <—-smug me, keeping a secret.
(And don’t try to study the Google Satellite images, Gentle Reader, to ascertain the number. I love you. But I’m not telling, and I have my ways to scramble those images. hehee)
So why do I plant so many heirloom tomatoes? The reasons are legion, dear reader, legion: I dearly love to can lots of tomatoes to make perfect meals like this one, for example, and I also like to make enough salsa that we won’t run out by Christmas (because nobody will eat “store-bought” salsa in our house), and also I just enjoy all the tastes and colors and shapes of heirloom tomatoes. I’m a tomato geek. I wear the label proudly.
There are worse things than being a tomato geek. Eh?
So with all these lovely tomatoes that I plant every year, if you think that I have figured out a very nice watering system by now, you would be . . . utterly wrong. Every year (until this one) I’ve rolled out the soaker hoses, having to hook together a (undisclosed) number of them, end to end, to snake through my tomato patch. You know the hoses, right? They are black, and kind of spongy in feel, and they don’t cost much, and they have a lifetime guarantee (a lifetime!! That’s a very good guarantee, don’t you agree?) so you just can’t lose, until one splits (the very first season) and thus your entire watering system–snaked through a multitude (don’t ask how many) of tomato cages (which you can learn how to make, right here) and so you spend every spare moment for the rest of the summer, watering all those tomato plants by hand, because (God forbid!) you don’t want those beautiful tomato plants, and thus your tomato dreams, to all die. You’ve got too much invested, by this time, in time and money and your heart, for pete’s sake. The children are lined up with plates full of tortilla chips, awaiting your fabulous salsa! Your husband is frying bacon at the stove, dreaming of excellent BLTs! Much is at stake!
Anyway. This summer, everything’s different, (cymbal crash!) at least in the watering-the-monstrous-tomato-patch arena.
Everything’s better.
Everything’s easier.
Everything’s faster.
Everybody is smugger. At least, I am. 🙂
I am smiling all over because of this betterness and easierness and fasterness and even the smuggerness. I’m not a rocket scientist (far from it, but I’m related to a few) but I feel particularly proud of it when I actually do something this smart. So, Gentle Reader, have I teased you enough now? You’re so good to keep reading. I’m playing with you.
Okay, okay, stop tickling–Uncle, Uncle, I’ll tell you!
I set up a drip watering system. And I love it. Every day when I go out to my garden, I smile (warmly) at my drip watering system. If it weren’t pretty unhandy to do so, I’d hug it, that’s how fond of it I am, even though we’ve only known each other for a few weeks.
I ordered a drip watering system actually, last year, but when I received the box full of tubes and connecters and goof plugs (what the heck–?) and so forth, I was in the flush of gardening season and really had no patience or time (I thought) to figure it all out. I know. That’s pretty pitiful, isn’t it? So early this spring, I took a little road trip to visit with my friend Jamie (you already have met her: she’s an accomplished market gardener, wedding flower grower and designer–basically I’m in awe of her and her talents–and she gave me the infused honey in my recent giveaway) because Jamie uses drip tape watering systems all over her place, as if she were a rocket scientist at this gardening thing. Oh, wait. She is.
And Jamie gave me a very quick and very patient tutorial to the wonders of drip tape watering. Turns out, it’s actually easy. And fun, really!
Here’s the scoop: there are many, many ways to set up a drip tape watering system, but for the home gardener (those are the key words) it is a very simple set up. You need only a few components. I can deal with a few components, can’t you?
To set up your own drip tape system, you need the following:
- drip tape
- a header line
- valves to connect the drip tape to the header line
- staples to hold the tape and line in place
- a pressure regulator and filter
- a short piece of hose to connect the pressure regulator to the hydrant
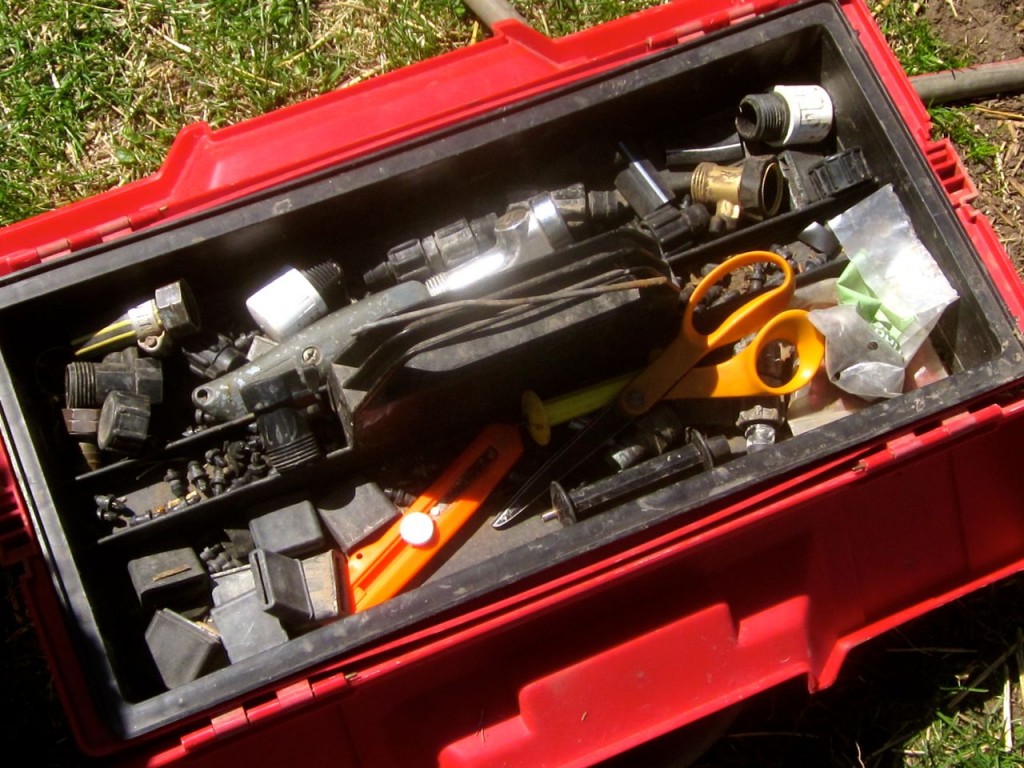
If you decide to set up more than just a simple drip tape system, you’ll need a tool chest like this one with all the components and other cool stuff that you might need, for repairs or additions. I don’t mind having an excuse to buy a new tool chest, do you? Here’s Jamie’s irrigation system tool chest.
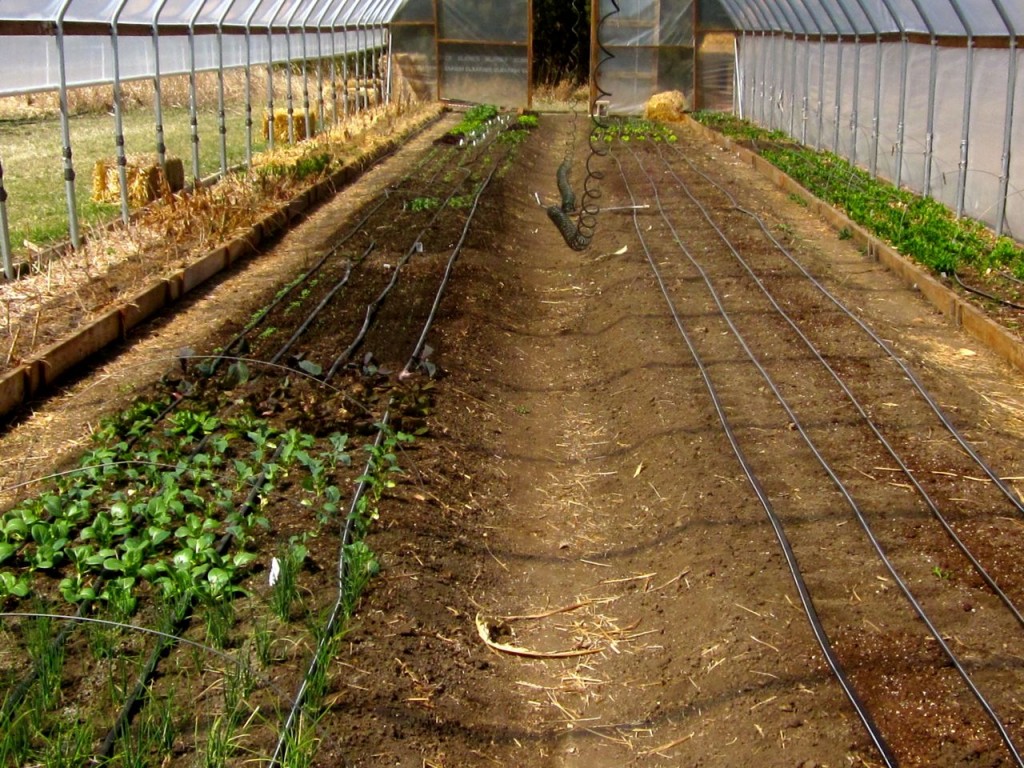
The drip tapes that Jamie uses (and now–I use) are laid out in the garden beds, according to what is planted in them. I plant most of my garden in 4′ beds. A 4′ bed needs 3 to 4 tapes. The water will spread out up to 2 feet in diameter from the tapes. Cool, huh?
My friend Jamie stopped what she was doing one afternoon to show me how she puts together her watering system. And guess what? The nice folks at DripWorks (where I bought my drip tape system) were kind enough to provide an awesome package for a giveaway! BUT . . . we’ll get to that later. Here are the photos, because I think it’s much easier to understand this with plenty of visuals. Don’t you?
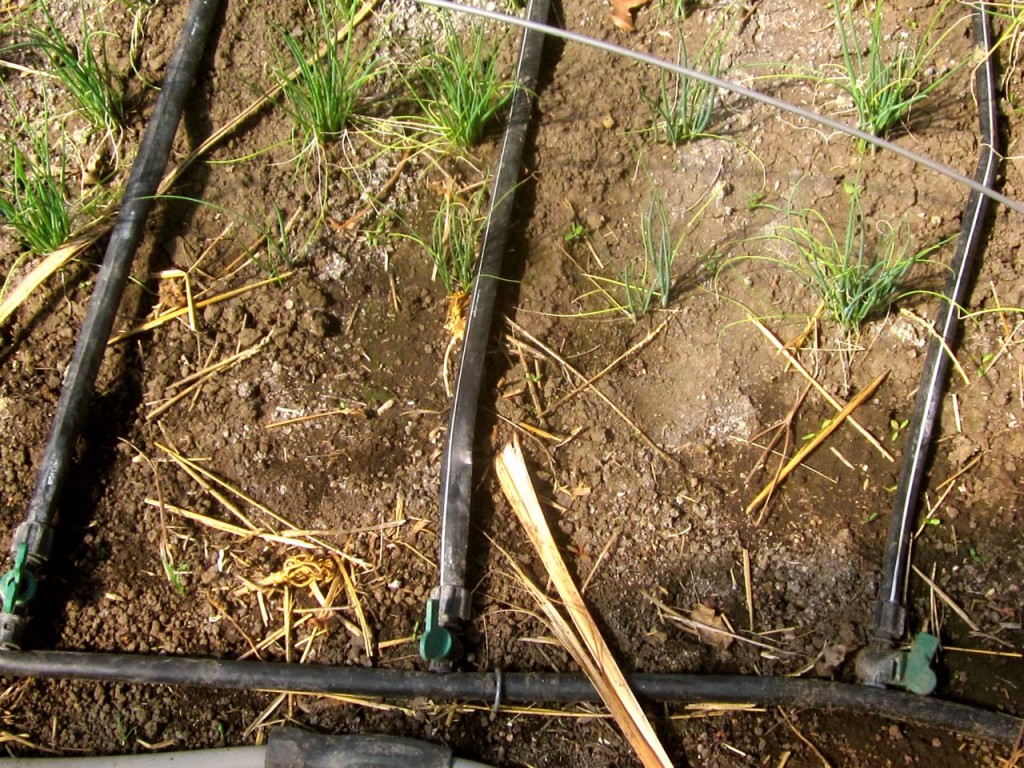
First, the drip tapes are laid out down the length of the beds to be watered. Drip tape comes on a giant roll, and you cut it to fit your garden beds. The tapes are anchored with long staples, which come with most systems. You can buy extras separately, too, natch’.
The ends of each drip tape are folded over and secured with bands that come with a kit, or (here’s a little tip from Jamie) a short piece of used drip tape!
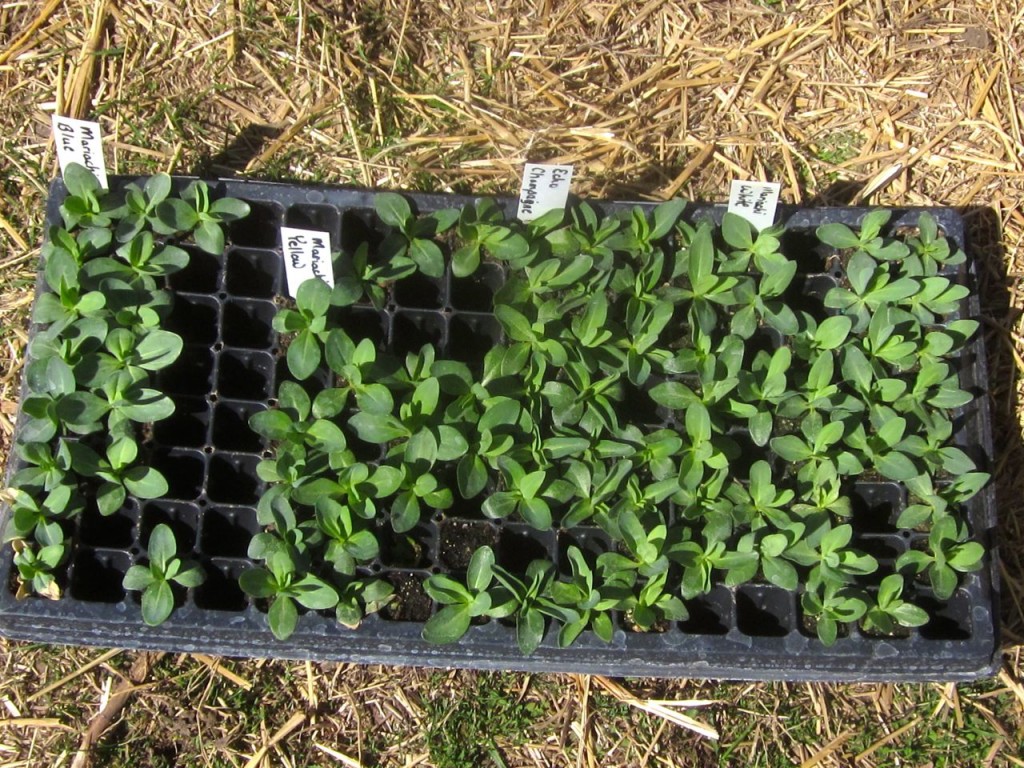
These little plants are lucky. They’ll be going into one of these tidy beds and will be watered neatly and thoroughly with drip tape. They have an awesome chance at making it to a fruitful old age, at Jamie and Norm’s farm.
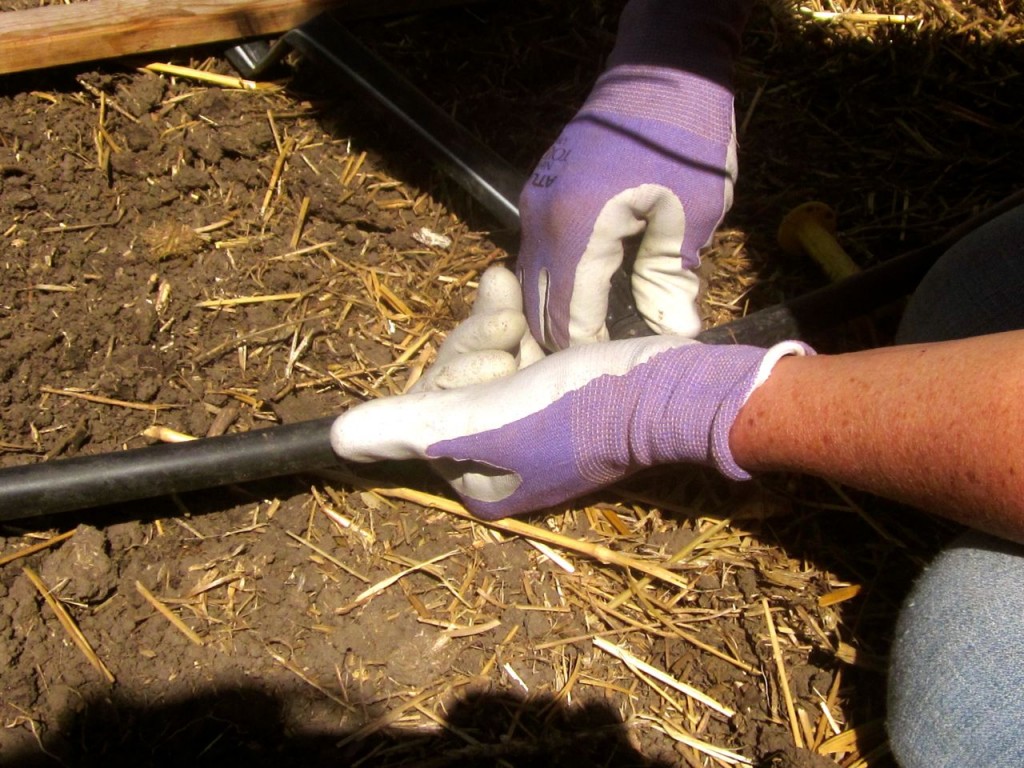
A valve is fastened to the end of each drip tape, like this. You can turn on and off the water down each tape with these valves, giving you control over which rows (or beds) get water each day, and which ones don’t.
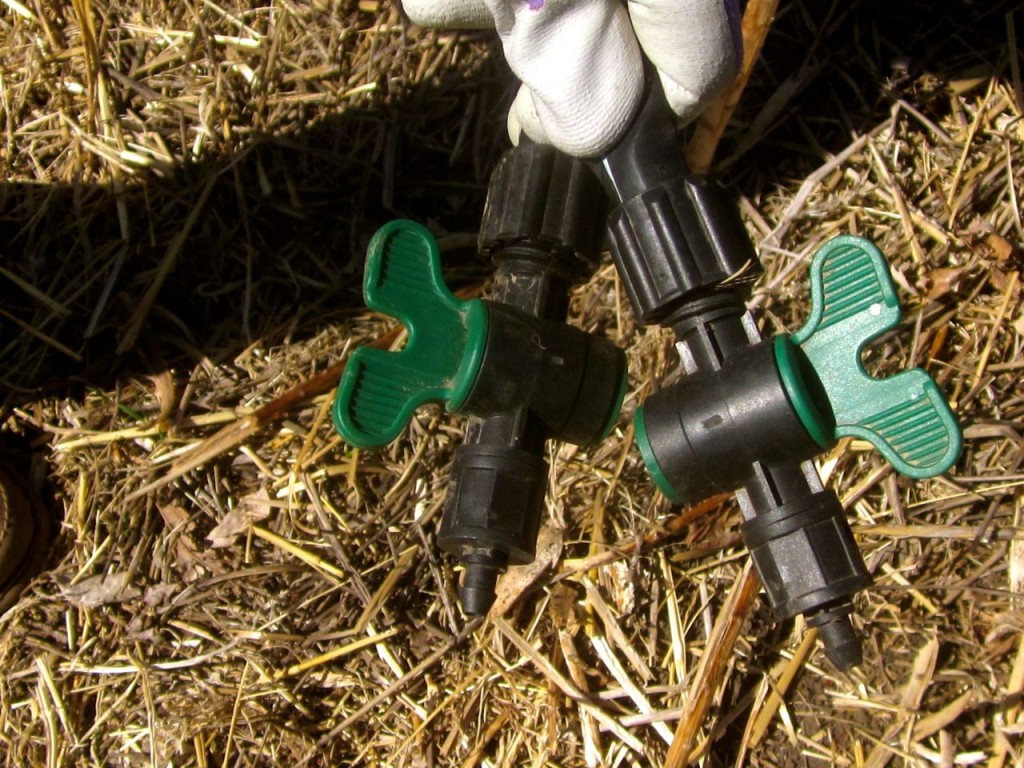
Next, you need a header line, which is a sturdy tube which will be connected to your hydrant. You see here the three components: the header line, then the valve/connecter, last the drip tape. Easy so far, eh?
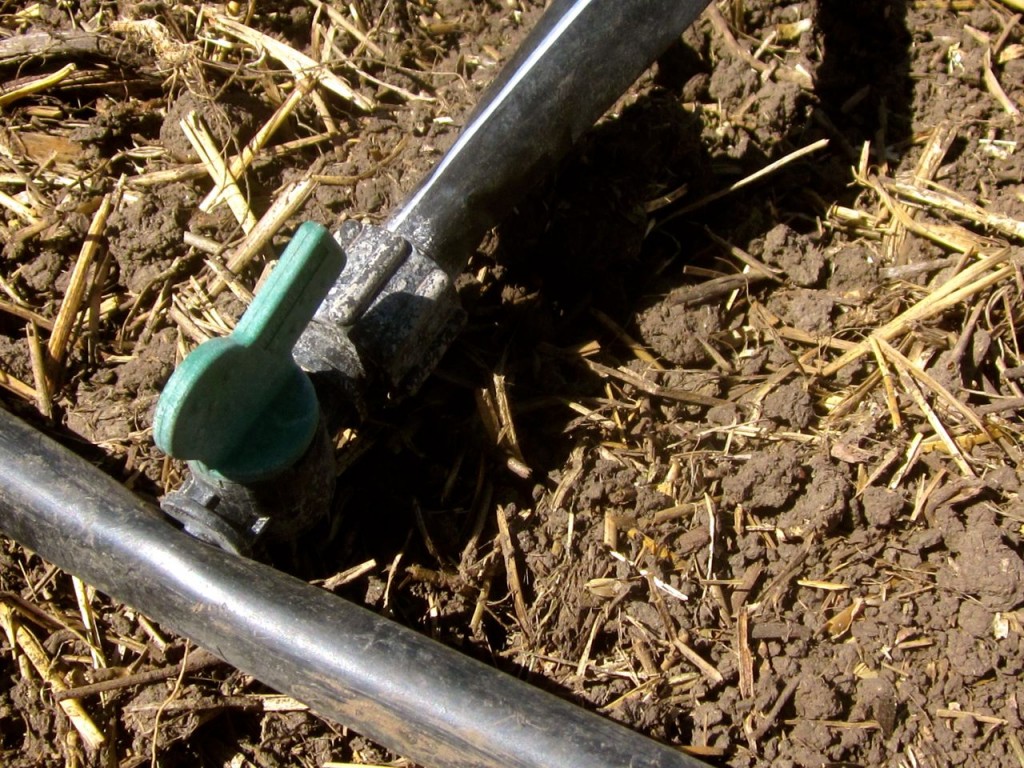
Here Jamie punches a hole in the header line, and fits the valve into it, connecting the drip tape to the header.
Ta-daa! Here’s what the lines of drip tape look like, connecting to the header (at the bottom of the photo) with the valves. You can also see a staple holding down the header line so it doesn’t go scooting out of place when your dogs go chasing through your garden. *sigh*
We’re almost finished. Are you still with me? Good. Now, because drip tape uses such low pressure water, you’ll need to attach a pressure regulator (and a filter, if you have any sand or sediment in your water, which you probably do). A pressure regulator will reduce the pressure of your water line down to an appropriate working pressure for the drip tape. Without it, your system won’t work properly. Without it, your beautiful drip tapes could burst and you’d be back where you started with . . . watering your tomato plants by hand, with a leaky hose. 🙁
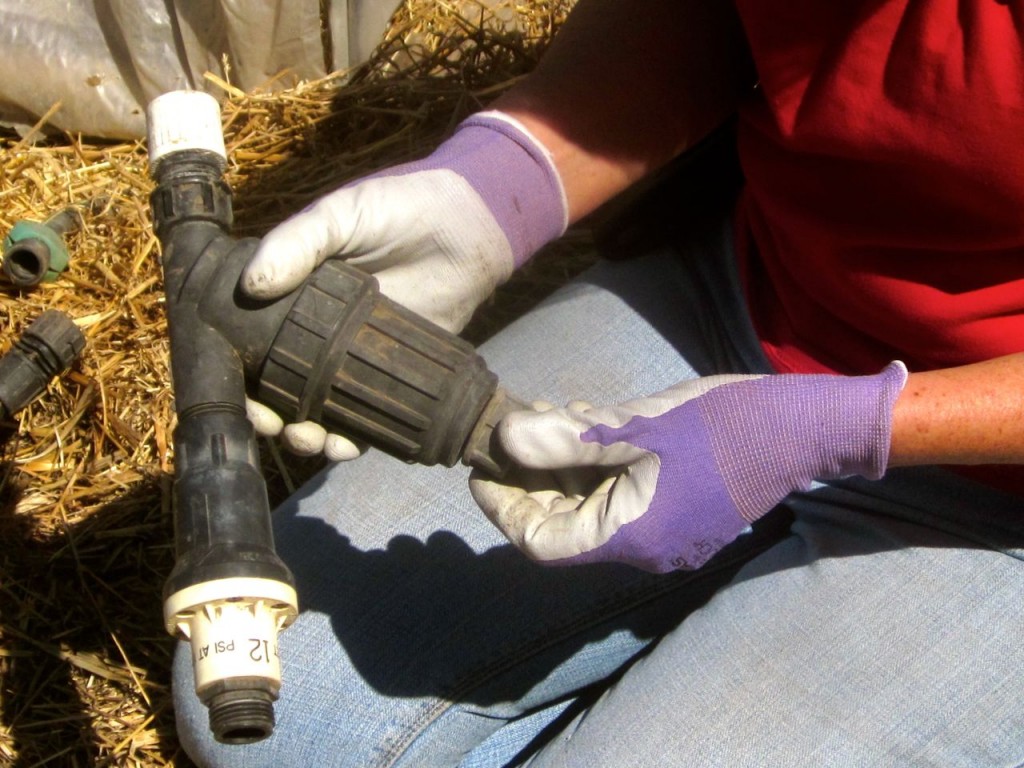
The pressure regulator and filter are hooked up to a short section of hose, which then is attached to your hydrant. Because my friends Jamie and Norm are crazy avid gardeners with many many beds of beautiful things growing at any one time, they use this four-way thingy, so they can regulate four hoses at once. I dearly want one of these now, don’t you? It’s so . . . so . . . shiny and official-looking, somehow. Perhaps if I invest in one of these four-way hose thingies, my gardens will look like Jamie’s gardens? Whaddya think?
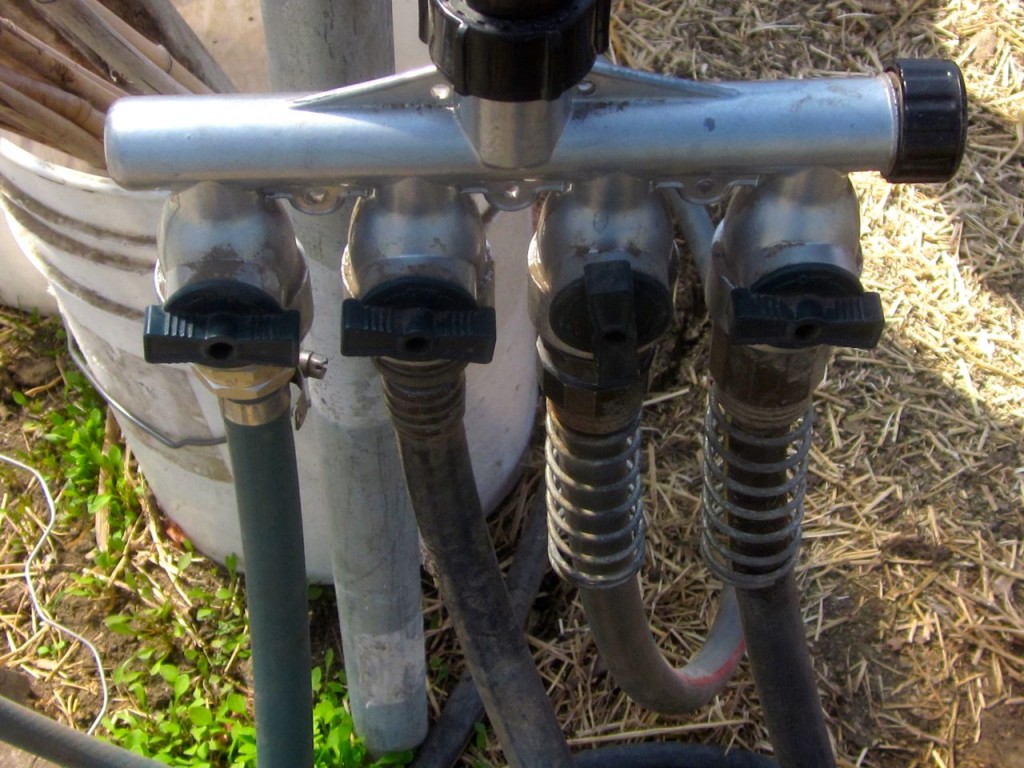
I really do want one.
Drip irrigation, with its flexible features and low-pressure emission, deposits water only where it’s needed, preventing it from being wasted and saving you money in the process! Saving water is good! Saving money is good, too! Rather than casting a wide spray or steady stream of water over a large area, drip irrigation dribbles out tiny quantities of water to provide steady soaking in specific places. You are in control, Gentle Reader, and control (as they say) is good. Especially in a garden situation.
So now that you’ve read every word of this post, you are interested and perhaps, even, enthralled with this idea of setting up a drip irrigation system for your garden, right? I hope I’ve taken the mystery and the rocket-science-part out of drip irrigation. Because I think if you’re like me, my busy Gentle Reader, perhaps (please tell me I’m not the only one) putting in a too-big of a garden to care for (cough) with the hours you have available in your day, you could probably use a system like this.
Now here’s the cool news that I hinted at earlier. Dripworks, a great company that puts out an awesome catalog of great-quality drip irrigation supplies have given me a drip irrigation kit to give away to one of my Gentle Readers. Check out the giveaway below, and enter as often as you can!
Hey! I’m sharing this post with the marvelous folks at at The Prairie Homestead. Join me, won’t you?
- Visiting Mary and Elna, and their flowers, too
- Spring lettuce salad with honey dressing, and a winner!
Great post my dear! I think you should have let me clean out the tool box first though!
Right now, I am watering my garden with my “never kink hose” . SURE IT IS. May get more planted this weekend. Winter just ended in MI, and now it is SUMMER!
I still water the old fashion way…with a hose!
We always plant between 18 to 24.. for the same reasons that you do. Would you be willing to share your salsa recipe?
Last year I set up a sprinkler to water the garden. It’s either that or using my stupid, always kinked hose.
This would be so handy in our water-desperate area of California!
For the last two years I have used soaker hoses but they always end up leaking and then I have to use duct tape to try and fix it.
I water my garden with a watering can, or a water bottle full of water. 🙂
I’ve been wanting a drip irrigation system for awhile! Right now I hand water from my rain barrels and when that runs out I just use my hose (which wastes tons of water).
Just setup most of my gardens with PVC irrigation. This would be a great addition to that!
Still new to gardening, but currently we use a hose to pvc pipe that runs across the head of all the beds. Then we have soaker hoses running from the pvc pipe down the beds. I’ve heard good things about drip tape though and think it may do a better job for our new garden area.
Always enjoy your posts. thanks!
I, too, plant an unseemly number of tomatoes, and while I enjoy watering by hand, a drip tape would be good for tomatoes to keep down disease by avoiding leaf watering. Maybe I’ll give it a try this year, too!
good point, Jamie!
I will be starting a garden soon in Arizona. This system would be wonderful!
Well Rosemary, I hope you win it! 😉 Don’t tell anybody else I just said that . . .
I water my large garden with soaker hoses and when those fail, a hose with a sprayer. Would love to try the drip hose, as here in AZ we conserve every drop of water possible!
Audrey, here in Nebraska it’s “feast or famine” where water is concerned, so we are very careful not to waste water, too.
I garden at a local community garden and we water using a garden hose. It would be great to have something different but (now that I entered) I’m not sure they will allow this type of system. But we may be able to use it on either our front or back yard – alas, not for food gardening but for flower gardening.
Alana, it would be awesome for flower gardening, too! Thanks for your comment!
I water part by hand and part by one of those sprinklers that have a slightly curved bar that moves back and forth. Luckily, it’s adjustable so I don’t waste TOO much water.
Even with my drip system, Sabrina, I still use hoses and sprinklers, too. The pampered part of the garden (i.e. the tomatoes!) gets the special treatment! 😉
How about you just send me a couple of jars of canned tomatoes? Go Big Red!
Maybe I could do some sun-dried ones, Michael . . ?
Great post Amy!
Your watering system sounds like a really effective one. Keep up the good work!
Thank you Sophie!
Drip irrigation is something I’ve just been looking into recently. Sounds like a great idea!
Barb, I LOVE mine. It certainly saves me bunches of time!
Oh my. I sooo need this!
Julia, I think everybody who gardens could use a system like this!
Currently I water my garden using a hose. I just broke the nozzle so I have to use my thumb to get the water to stream, so I can get the water to go to the end of the garden. Huge pain. I tried to get a sprinkler, but it was too hard on the plants.
It sounds like you NEED this drip system, Kelly! 😉
I water the garden with a hose. Usually. Sometimes a sprinkler. Sometimes a bucket. Whatever my master–I mean mummy–wishes. 😉
hehee
I water with a hose. My hydrate is quite a ways from my garden so I am not sure this would work for me tho I would sure love one if it would. I have 2 hydrates and the one closest is across the road so I use 2 hoses to get over to the garden and my 2 new apple trees. then have to unhook the hoses as I leave one on one side of the road and take the one attached to the hydrant back over. A pain for me also but one must do what one must do.
Oh my Lesa, that does sound like a bit of a pain! But I like your positive attitude: you do what you’ve got to do! 🙂
I currently water with soaker hoses and thought that I was pretty smart for doing so until I read about this drip hose system. I will definitely be setting one of these up in my garden.
I always felt pretty smart about using soakers, too, Candice, but mine do seem to have a high rate of failure. Maybe it’s my own ineptitude, but they invariably spring a leak which messes everything up!
We love our drip irrigation! It saves so much time & water, plus it does a better job getting water to all our plots, pots & tree rings. Some sections are connected full time (& on timers) and some get connected as needed (for manual flow).
Amy…. where have you been all my life…I too am a tomato snob, and proud of it. If you grew 10,000 individual plants that would not bother me at all. If I had the space I would. I mean why wouldn’t you want home grown tomatoes all year round, fresh tomato sauce, fresh salsa, and with home grown bacon in the frying pan you could make some awesome tomato basil cream soup. There just is no taste like a fresh tomato from the garden. When I was growing up we kept a salt shaker in the garden just for the first tomatoes of the year!! I have said enough!!
See . . . see. . . Monte Turner, I had a feeling that we were kindred spirits and now I know that this is true! Nice to meet another tomato geek! And today I’m taking a salt shaker out to my garden, in anticipation! 🙂
This is my first year planting a garden and I’m still enjoying watering with a hose every day so that I can see what has sprouted. I only have 5 tomato plants along with my other veggies, but I am so excited about them! I would love to get a watering system set up from the beginning because I’m pretty sure that a couple more weeks of Nebraska heat will make me not so excited about going outside to water every day.
Thanks!
Yup, Tina, as the weather heats up and the days get longer, a drip tape system becomes more and more welcome!
We are attempting our garden AGAIN this year b/c we desperately NEED to go organic (family health issues are majorly controlled by eating healthy!) and watering is ALWAYS an issue! This is fantastic and while I’ve entered to win, I think we’ll be purchasing two systems… We’ve got two huge gardens for our family of 6 and to share our food and prepping! Thanks for this!!! God bless!
Kim,
I just know that you’ll love using drip tape! It just makes so much sense, and saves you tons of time, in the long run. Blessings to you!
I would love to win this. Drip irrigation is wonderful.
That looks like a really great irrigation system! Thanks for giving such a detailed tutorial on how to install it.
This is a fantastic giveaway! especially since I am one of those “overwaterers” 🙂
Some drip, some hose, and some watering can!
This year I had started a ton of tomato plants for my friends and their families. Well, with spring coming so late here in NE WI, many of them didn’t get their gardens in and I ended up with 58 tomato plants in my garden. I have NO idea what I am going to do with them all and even allowed some of the smaller ones to die off, but I still have way too many.
Dana, make salsa! Can tomatoes! Dehydrate tomato slices and freeze them! Share with your friends. Sounds like kind of a nice problem to me. 🙂
I water my garden with overhead sprinklers as it is sooo big. I know plants don’t like to get too wet and it’s better to water at the base of the plant. The smaller part of the garden, I do water by hand :0( It takes many hours moving sprinklers and trying to keep up! Nothing worse than having to move a sprinkler where there’s mud just before you go to work. 🙁 But in the end, I guess it’s worth it!
I totally understand your planting so many tomatoe plants. I love to so the same thing although maybe not so many as you. I feel you need one plant of each color and size and shape, sometimes two just in case one plant dies. I drive my husband crazy as he thinks one plant is enough. I would love to win a good drip system as the one I have set up isn’t the best.
I would love it if you won, too, Dortha. Remember that you can enter (with Twitter) every day, and there are (I believe) 5 days left. Good luck!
Thank you 🙂
I think that drip irrigation is a great way to water a garden! Like you said, it provides steady, gentle soaking to an area without wasting water by spraying it needlessly around. I really ought to set up a drip irrigation in my yard to help conserve water. Thanks for sharing!
Yes, yes, Hazel, it’s the way to go! It takes a bit of time to figure out and then to put into place, but it saves tons of time and money throughout the season!
My husband has always had a “green thumb” and could grow tomatoes of every variety, but a few years ago he was able to get the biggest yield he ever had. How did he do that? It was due to organic compost and a LOT of time watering.
This year we hired a professional to put in line irrigation and we attached drip lines in each of the rows… it is a dream. If you can spend the extra dollars it is well worth the time.
Great post.
I have a small garden so I still water with a hose.
Drip irrigation is a great way for my larger garden in the future.
Thanks for your sharing!