
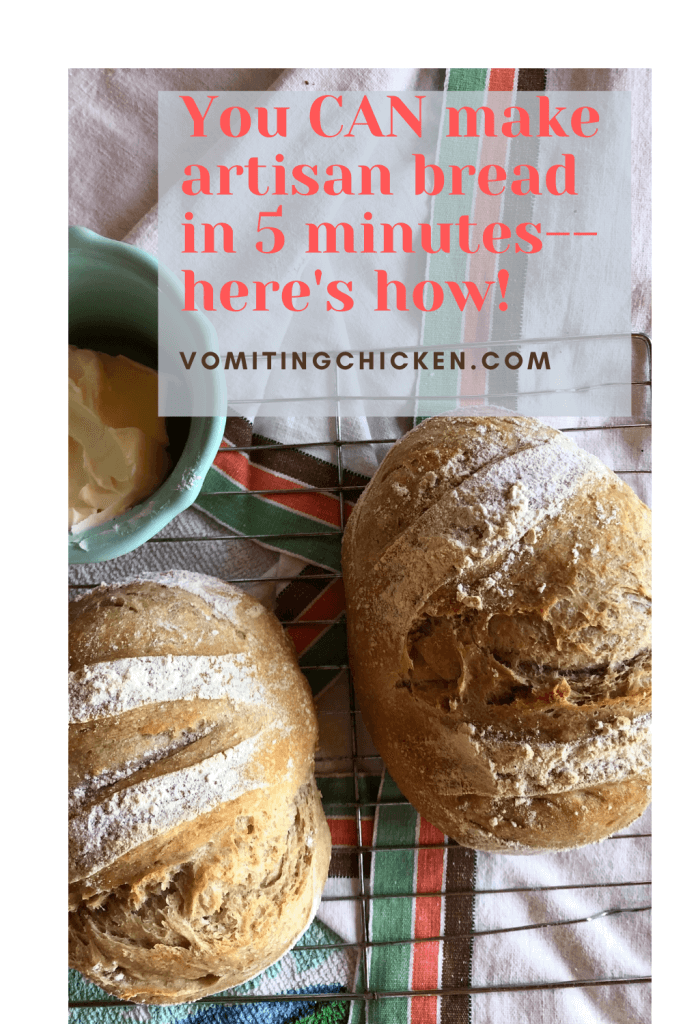
YES you CAN make artisan bread in 5 minutes: here’s how!

Keep a batch or two of this basic artisan bread dough (or “bucket dough”) in your ‘fridge and you’ll always be ready to make scrumptious artisan bread in 5 minutes (or so) plus baking time. Here’s how.
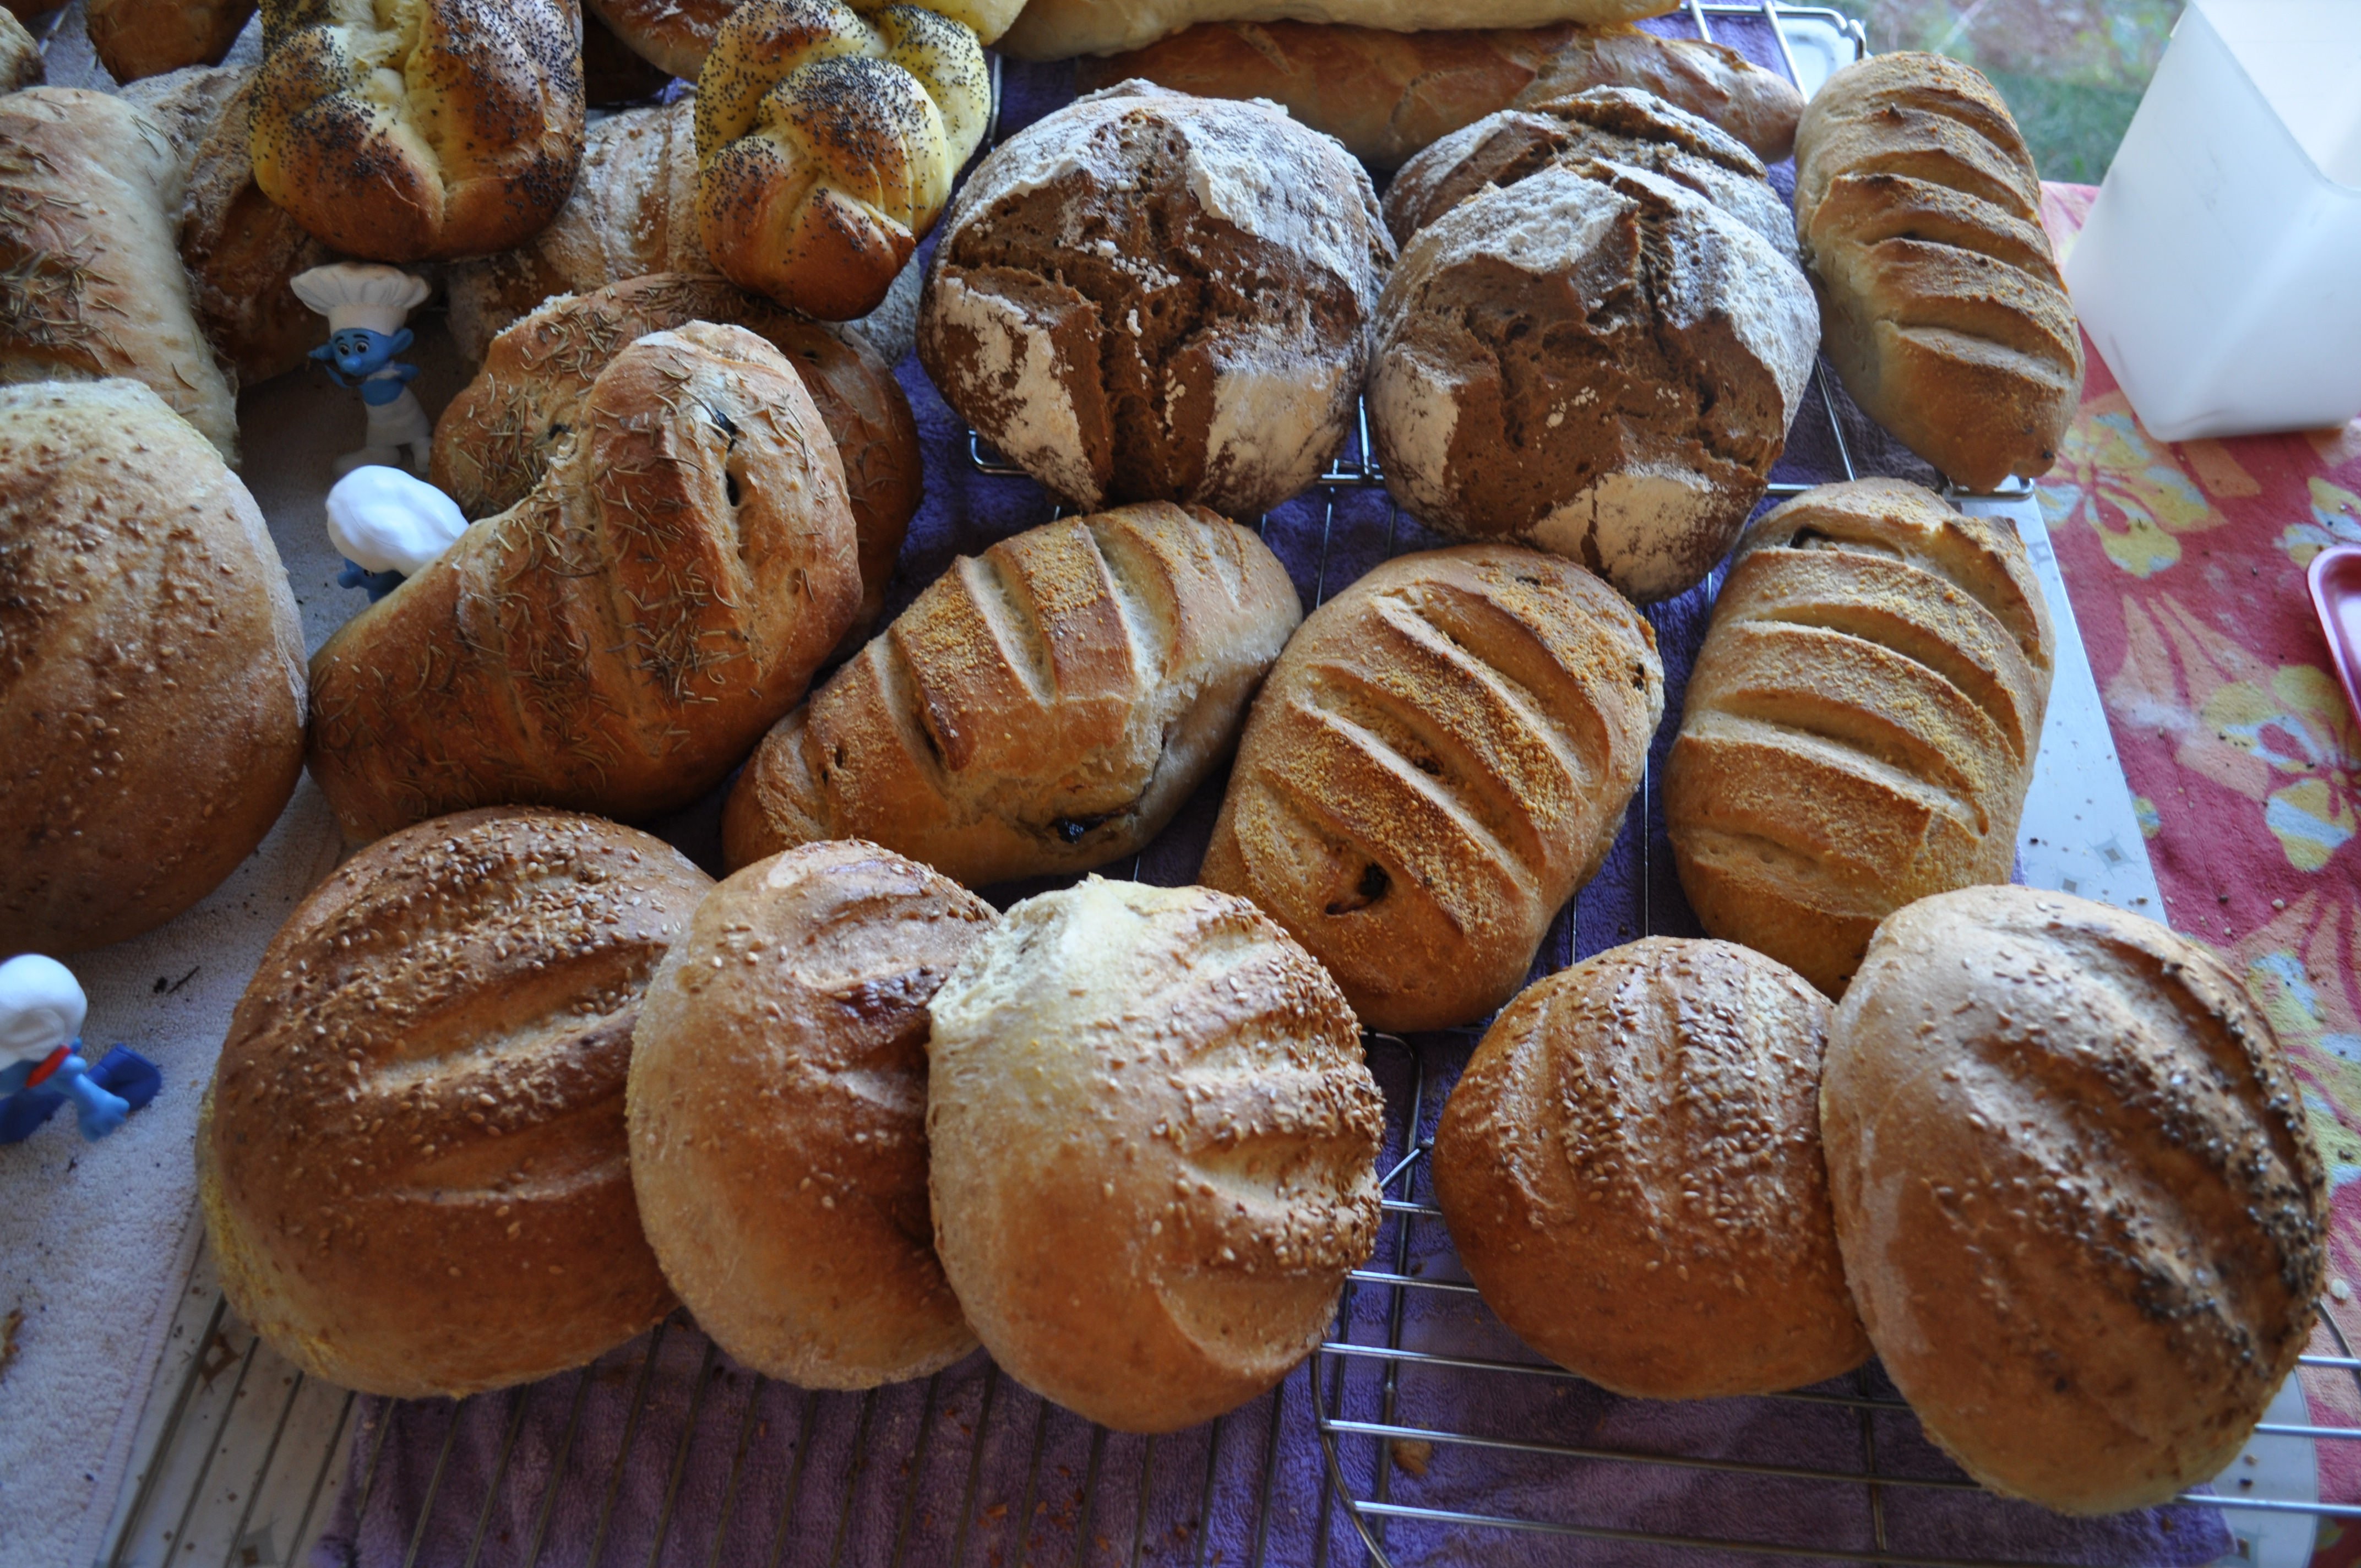
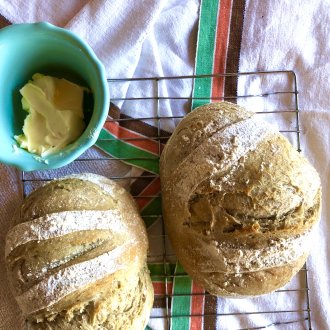
From top: braided challah, mocha honey loaf, sundried tomato and parmesan cheese bread, rosemary olive bread, flaxseed country loaves.
A Brief Bread Backstory
My intrepid mother, my daughters and I used to sell breads and other baked goods at a local farmer’s market. (In fact, I wrote an ebook about it. Check it out here.)
We started out small with one table and a few baked offerings–pies, sweet bars, quick breads, donuts, and my homemade breads. Within a few weeks, hands and wrists aching from all the kneading that traditional yeast breads require, I switched over to this 5-minute artisan bread (or “bucket dough”) method.
I never looked back.
We bought a couple more tables, as our business grew quickly and so did our ability to make lots of baked goods quickly.
Switching from traditional kneaded yeast breads like this crunchy 9-grain loaf to baking primarily with the 5-minute artisan bread method made all the difference in the world in how many loaves of bread I could make very quickly.
And it was excellent bread. It lacked for nothing.
Many years later
Eventually we retired from farmer’s markets, but I can still put hot bread on the table in very little time, as long as I keep a bucket or two of dough in my ‘fridge. It’s my super power. (One of them.)
It’s a super power that anybody can learn though, gentle reader, thus today I am sharing this power with you.
If you’ve been dreaming about making hot artisan bread, or possibly you’ve heard of Jeff Hertzberg and Zoë François’s excellent book, The New Artisan Bread in 5 Minutes a Day, and maybe you’d like a Reader’s Digest version of how to make it, you’ve come to the right place.
I’ll put in a plug for that book, since you mentioned it. 🙂 My own copy is dog-eared and sticky-noted and, well, just plain sticky. This cookbook is full of great recipes for everything from rustic peasant loaf to chocolate-filled brioches, all made with this super-simple bucket dough method.
You probably really oughta just add it to your cookbook library, too. (I have affiliate links in this post, which means, of course, that if you click through and order something, I’ll get a small commission at no extra cost to you, which is nice for both of us. My entire affiliate disclosure is here.)

Now are you ready to try your hand at 5-minute artisan bread?
If you’ve never made bread before and are intimidated by the whole process, this post is for you. If you’re a seasoned bread maker and want to try something new, fun, and easy, this is also for you.
You really CAN make artisan bread in 5 minutes.
Okay. Let’s do this thing.
How to make artisan bread in 5 minutes
I took some liberties and changed the original method a little. You can pop over to the Artisan Bread in 5 website–it’s excellent--for lots of great recipes and videos, too.
First, gather a few pieces of equipment
- A one-gallon ice cream bucket with a lid, or a lidded bowl about the same size
- Danish whisk
- Pizza stone
- A cookie sheet*
- Parchment paper
- a small pan that will hold a cup of water, and that fits in the bottom of your oven
- A sharp knife or a bread lame
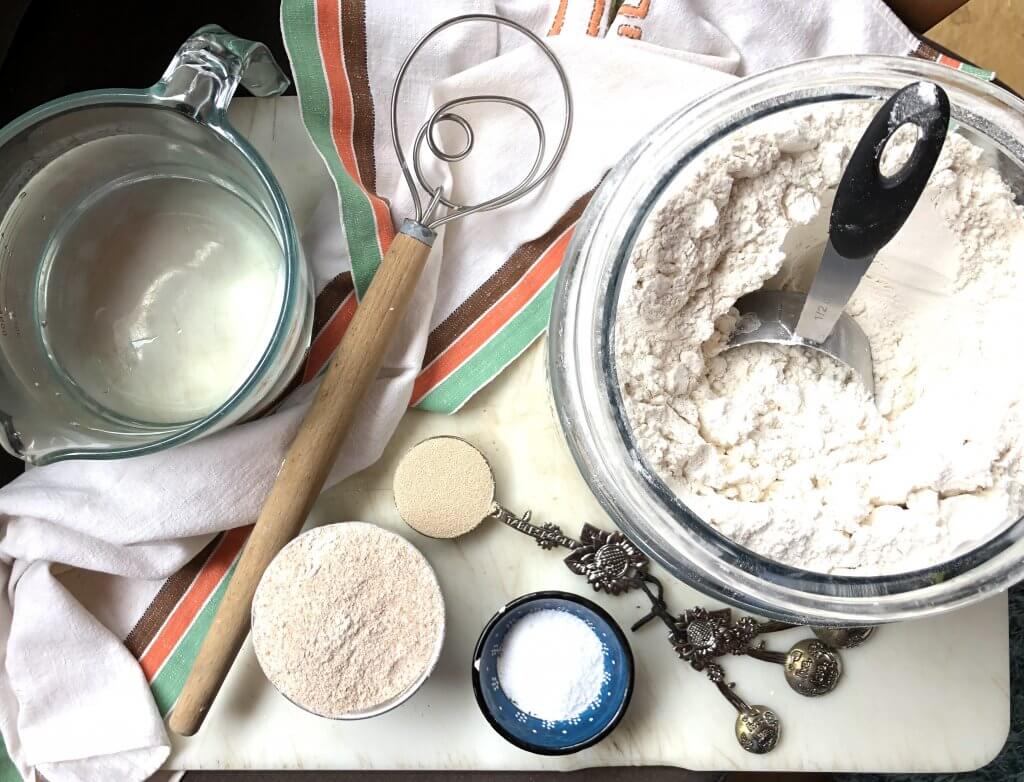
Second, assemble a few ingredients
- very warm water
- granulated yeast
- kosher salt
- whole wheat flour
- unbleached flour
- a handful of cornmeal
That’s it! *cymbal crash* Are you not amazed? Are you not ready to do this thing? So little equipment + so few ingredients = bread that anybody can make. Even me. Even you!

This is a very wet dough. Here’s what it looks like when it’s freshly mixed, before the rise.
Third, mix up the bucket dough
- Stir yeast and salt into the warm water
- Add the flours
- Stir, stir, stir, until incorporated
- Prop lid on top (but leave it ajar).
- Let sit for 2 hours or until the dough rises to the top of the bucket.
- Sock into the refrigerator for a few hours, preferably overnight.
Tip: If you’re in a big hurry, you can use the dough after the initial rise, but it will be floppy and wet. It’s much easier to use after it has spent the night in the refrigerator.
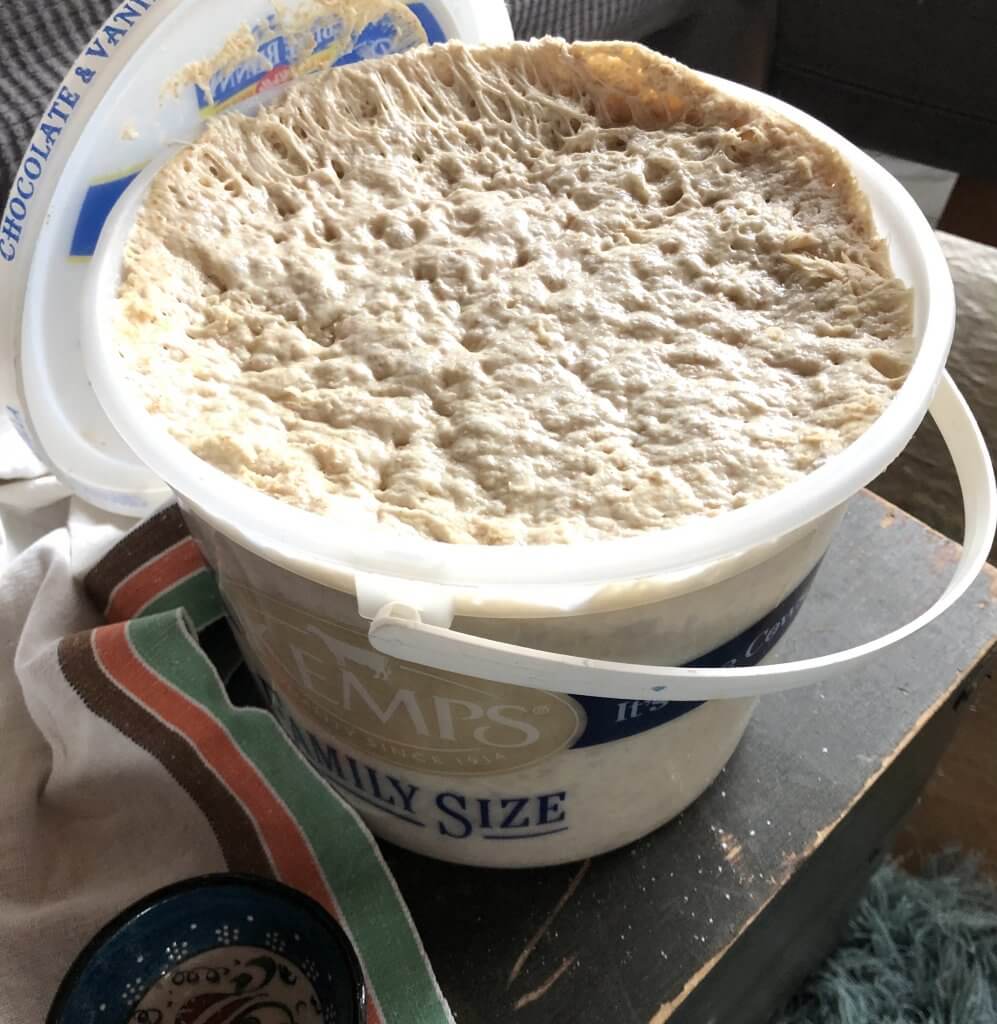
The dough has risen to the top! Time to go into the ‘fridge.
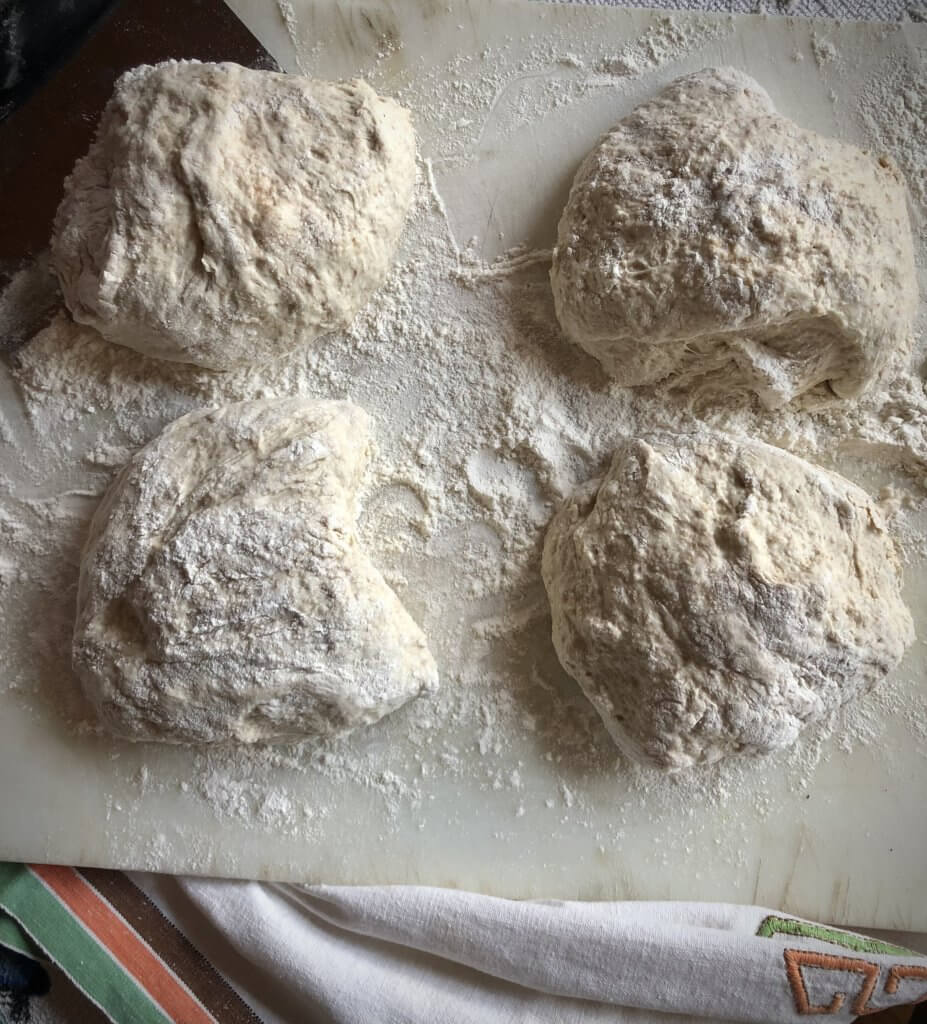
After an overnight break in the ‘fridge (if you have the time, I prefer it) cut your bucket o’dough into four equal pieces.
Fourth, shape your loaves
Now comes the fun part.
- Ease your dough out onto a floured board and cut it into four equal portions. Remember: no need to knead! (Save those lovely hands for soothing fevered brows, or playing a Mozart sonata on your grand piano in the next room. Don’t knead.)
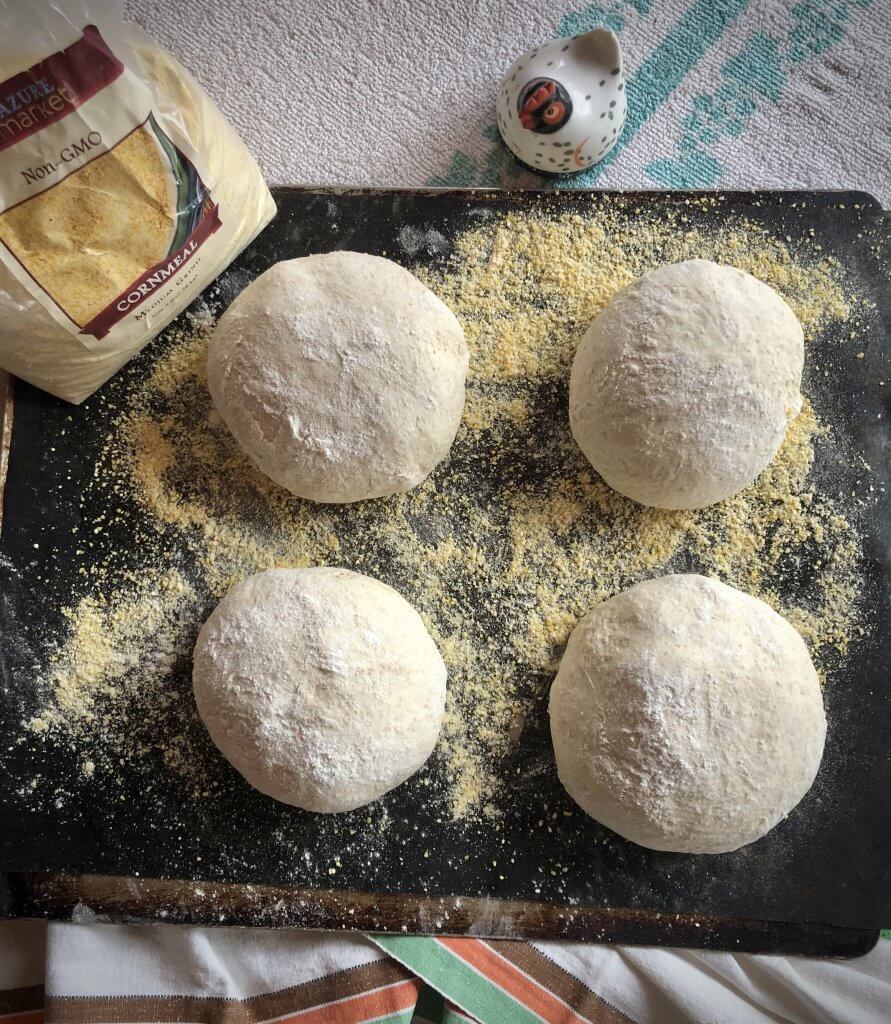
- Dust a parchment-lined cookie sheet (without edges) with cornmeal.
- Quickly shape four loaves, sprinkling the dough with additional flour if it sticks to your hands. Smooth the dough on the top and pinch together the dough on the bottom of the ball, until a compact ball forms. Place the balls on the cornmeal.
- Let rise for 40 minutes.
- After 20 minutes, place the pizza stone into your oven, and preheat to 425°.
Pro tip on the shaping of the loaves
Here’s a video made by Zoë François on how to shape, or “gluten cloak” this generally very wet dough. It’s worth a quick watch if you have questions about it. In my opinion, it’s the only tricky part of this process.
Fifth, bake your bread
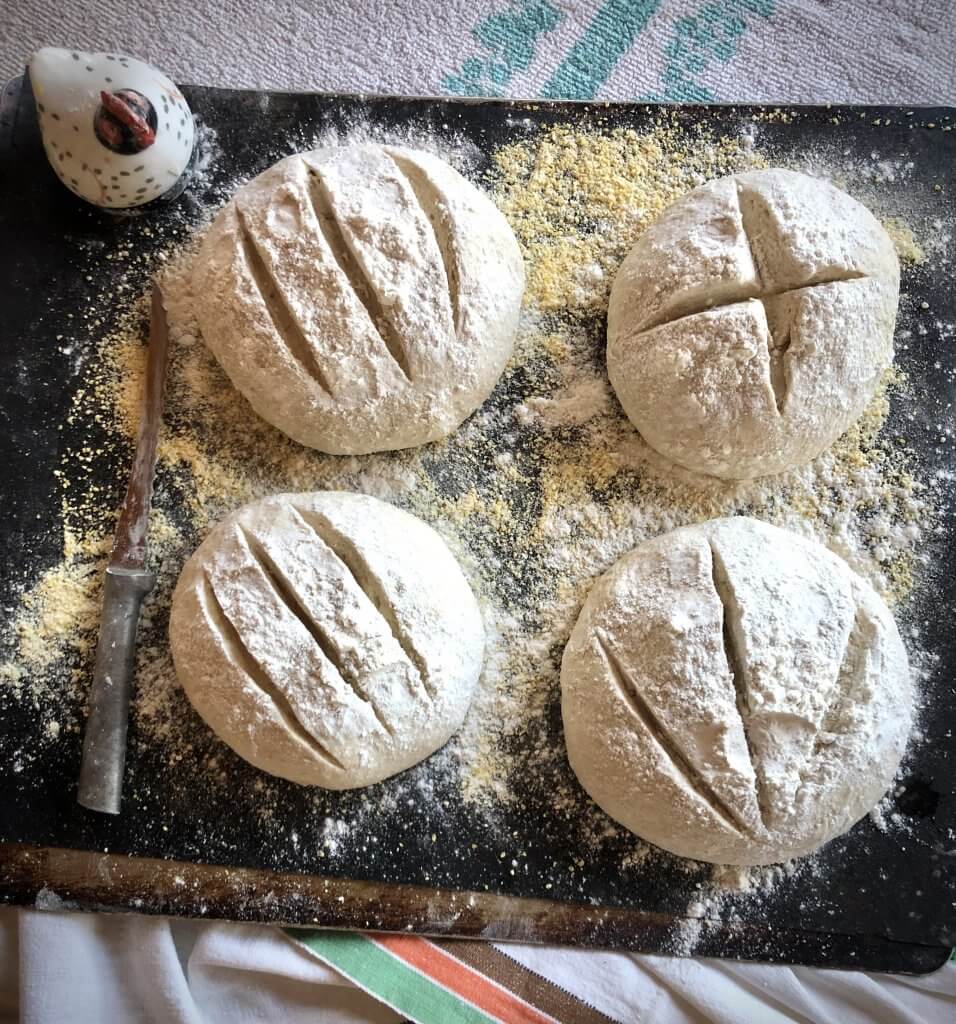
- When your 40 minute timer goes off, dust the loaves with flour and make a couple slashes across each loaf (the design is yours to choose!) with a very sharp knife, or a bread lame.
- Pour one cup of water into a small pan (I use a very small bread pan) and slide it into the bottom of the oven.
- Slide the loaves onto the parchment paper directlyonto the baking stone, removing the cookie sheet carefully. Don’t put the cookie sheet away yet, though!
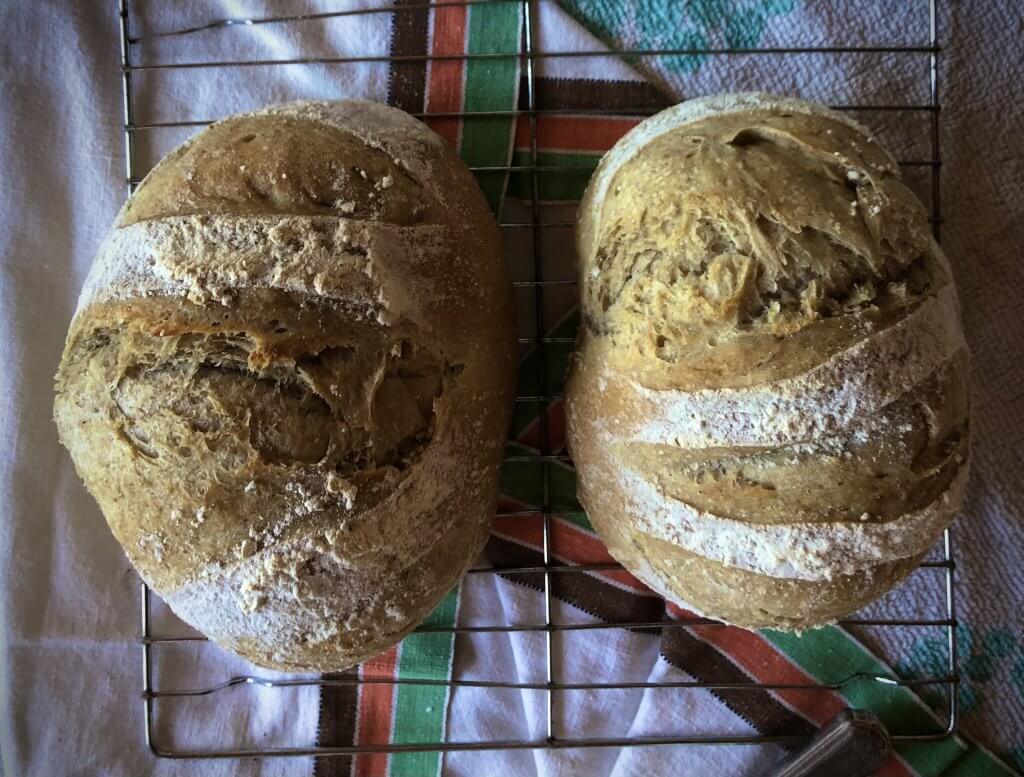
- Bake for 20-25 minutes, or until golden and the bottom of the loaves is golden and firm too.
- Pull out your bread by inserting the cookie sheet underneath the parchment paper and slide the loaves on wire racks to cool. We usually sacrifice one loaf to eat hot, with soft butter! You can’t beat it! (And I say “sacrifice” because slicing hot bread usually mashes it to some extent.)
 (But it’s worth it!)
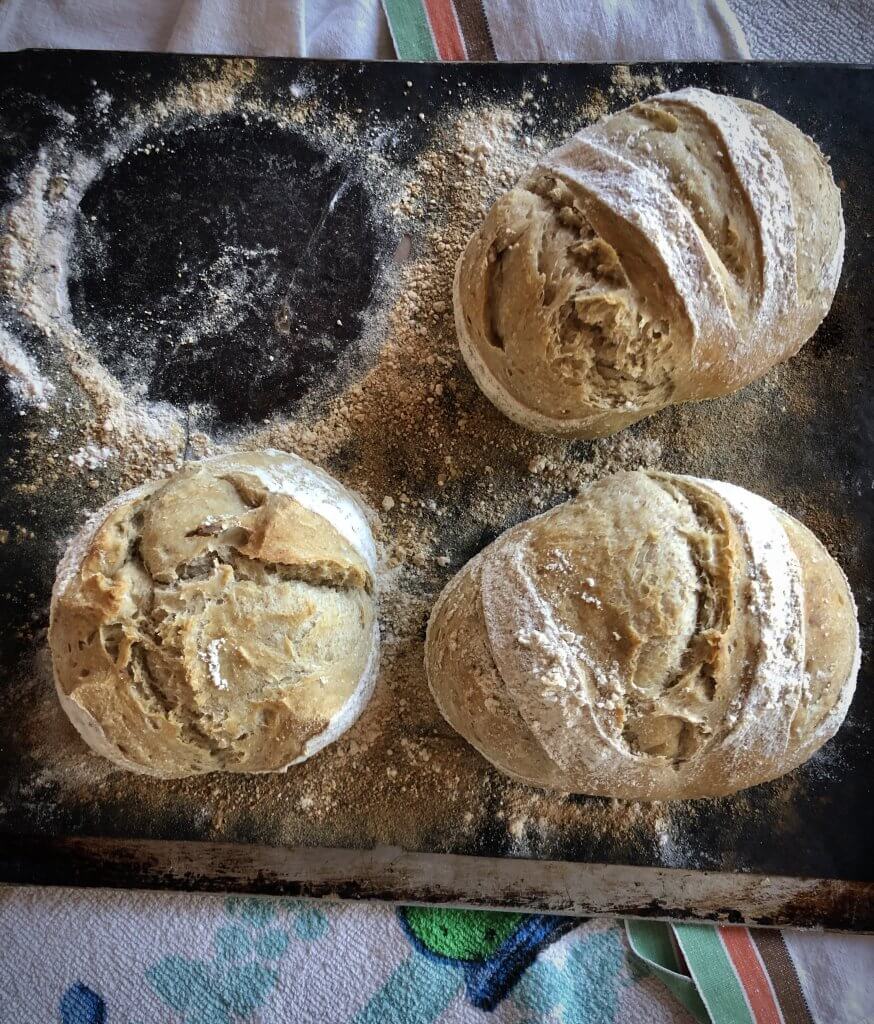
There were four loaves, but a friend happened by and I gave him one. 🙂
Pro tips from somebody who has made thousands of these loaves of bread (me)
- The very hot temperature and the panful of water in the bottom of your oven makes a steamy sauna for your bread loaves that will make the nicest, crackliest crust that you can imagine.
- I don’t wash the bucket out; as soon as I dump the dough out, I take the approximately 1.5 minutes’ time to mix up a new batch of dough. Easy-peasy, efficient, and above all: SMART!
- Once the bread has fully cooled, you can store it in a plastic bag, though my guess is it won’t last that long. If you want to gift a warm loaf, place it in a paper bag, not plastic.
- Soft butter, homemade jelly, honey, and peanut butter are all excellent toppings for this chewy, dense artisan bread. It also makes wonderful grilled cheese sandwiches.
- If you want to make larger loaves, simply cut the dough into fewer chunks.
- You don’t have to dust the parchment paper with cornmeal. You can also use whole wheat flour, rolled oats, sesame seeds, or anything else you take a fancy to.
Yes, you can add other ingredients to this recipe
You can substitute cup-for-cup any flours for flours in this recipe, though I’ve found that keeping at least some of the all-purpose, or unbleached flour makes a better texture. You can also add 1/4 to 1/2 cup of non-flour ingredients, including chopped olives, nuts, seeds, shredded cheese, oats, and more. Experiment! It’s fun and you’ll undoubtedly find a new favorite recipe.
- Einkorn flour
- wheat germ
- rye flour + caraway seeds
- wheat bran
- rolled oats
- sunflower seeds
- toasted walnuts or pecans
- a mix of seeds and nuts
- chopped olives
- sun-dried tomatoes
- molasses + cocoa powder
- shredded cheese
- chopped herbs
- sesame seeds
- poppy seeds
You’ve done it.
You’ve made artisan bread with just a few minutes of effort. I highly recommend that you pop over to the website I mentioned above and enjoy a bit of time familiarizing yourself with the “bucket bread” method. It’s a great website, with helpful links and hints for buying equipment, lots of recipe variations, and updates on the books that they have available. I have several of them.
Here’s the recipe in a handy, printable format!
Light whole wheat artisan bread
Ingredients
- 1-1.5 Tb kosher salt
- 1-1.5 Tb yeast
- 3 cups very warm water
- 1 cup white whole wheat flour
- 5.5 cups unbleached or all-purpose flour
- 2 Tb cornmeal
Instructions
- Use a Danish whisk to mix yeast, salt and water in a plastic 1-gallon bucket or similar-sized food container or bowl.
- Stir in flours.
- Prop lid on top of bucket, but don't close it all the way.
- Let dough rise until it reaches the top of the bucket, approximately 2 hours.
- Put dough into the refrigerator for 2 hours, covered, or overnight if possible.
- Shape dough into four loaves on a sheet of parchment paper and let rise for 40 minutes.
- Preheat oven to 425 degrees, and place a pizza stone on the lowest rack of the oven, and one cup of water into small pan onto the floor of the oven.
- Slide the loaves, parchment paper and all, into the oven, onto the pizza stone.
- Bake for 20 to 25 minutes, until golden brown on top and firm, golden bottoms.
- Cool on wire racks. Then enjoy!
Shop this post:
Don’t think of it as an expense, but an investment. You’re investing in a happier, healthier home and family when you learn how to bake your own bread. Here are the supplies I use to make my artisan bread in 5 minutes per day (affiliate link, obs).
1. Bread-maker’s lame, for beautiful slashing
2. A pizza stone that fits your oven
3. A Danish whisk (these used to be rare and pricey, but they are much cheaper now and easier to find)
4. Food-grade buckets (one gallon or larger) with lids, if you can’t find ice cream buckets that size.
5. Bulk yeast is much cheaper* than buying it in the little envelopes. (This is the brand I prefer.)
6. A good cookie sheet without edges, for ease of sliding.
7. Re-usable parchment paper (lasts for years and years)
8. My chicken timer (invaluable!)
9. A bench scraper (to cut the dough and clean up afterwards)
10. Good kosher salt (this is my favorite and if you use my link and special code at checkout (saltychicken) you’ll get a 15% discount!)
But wait, there’s more . . . a few helpful links:
-
-
- My broiled flaxseed bread recipe: a traditional yeasted bread, if you want to forge into new territory, where breadmaking is concerned.
- People who smell hot bread baking are happier, studies have shown.
- This is fun to make: Dutch oven artisan bread
- You can use this same dough to make rosemary garlic foccacia bread
- ….with which you can make this stunning sandwich that my sister invented and then named after herself: the Moll.
-
Pin it to remember it
Thanks bunches for popping in, gentle reader, and for reading to the very end. Well done!
Questions? Comments? Concerns? Observations? Please avail yourself to the comment section below. And if this post helped you in any way, may I ask you the favor of sharing it with a friend or relation?
Humble thanks!
*hugs*
- how (and when) to trim the spurs on your rooster: the right way
- Day-old donuts: how to refresh & make them taste good as new!
O.M.G, Amy!!!
You are amazing…incredible…fabulous…(should I stop now???)
I am off to pick up my bucket with free ice cream IMMEDIATELY to do this…wait…I saw 4 buckets…4 ice creams!!
I can’t WAIT to try this method – hugs!
Carrie
Thanks Carrie, you’re so sweet, and enjoy that ice cream and when you’re hungry again, you can make bread. Cheers, chickie!
I love, love, love baking bread. But I haven’t done a whole lot of it in the last couple of years. I think I even have that book! And a bread machine I bought at the Salvation Army a couple of months ago that’s been completely ignored lol I think I need to go buy some yeast now…
Yes Gwynne, buy some yeast and let me know how the bread turns out!
Great, inspiring recipes. I hope some of your readers try these.
I heard that the reason the smell of warm bread makes people more agreeable is because baking bread together is one of mankind’s earliest memories. There’s something very appealing in this thought.
I love this thought, Francene! Thanks for sharing it with me.
I used the wrong url above. Thanks again for a great post. I can smell bread baking from here.
Oh my, Oh my! Now you’ve set me to craving…I absolutely love how delicious it looks and I can almost smell the bread. I am a bread addict, I confess. Thanks for sharing this recipe. 🙂
Thanks Sharon!
I completely enjoy the journey you provide each time I come by! If I ate bread this is exactly what I would want to make. It sounds absolutely delicious. Thank you! Best Regards, Wendy UBC
Thanks Wendy! Glad you enjoyed the recipe.
Soooo easy!! Love it!!
No Need To Knead…I love it. And I must mark this page so I remember to bake some as soon as I get home (where it just happens to be snowing this morning and they are under a flood watch for the next two days, one of the rivers is cresting at 11 feet) I love home made bread, and would like to make it for our farmers markets but Wisconsin won’t let us sale food at the fairs unless we can prove it was made in a professional kitchen. I would love to do pies, tarts, and bread if I could get around this law. Thanks for all the leads, I may just find a way to do it. The FDA does not have a problem, it’s the dept. of Ag. because they want to charge you $375. for a permit.
Chef,
I’m so sorry that the FDA is so problematic with its onerous laws. Hmph. We are allowed to do baked goods in our non-commercial kitchen as long as we post a sign “All Baked Goods prepared in NON-INSPECTED kitchens.” (How’s that for a turn-off??) All our customers are smart enough to know that it’s buyer-beware and they trust us, though our kitchens are not commercial.
Mmmm, I can smell it, and I haven’t even started yet 😉
Mmmm, I think I can smell it, too Janelle–is it in your oven yet?
Oh wow I love this and I love the cheese bread. Fantastic and I am going to make it soonest, once the kitchen is finally unpacked !
Anita-Clare, let me know how it turns out for you!
And so begin the carb cravings …
Stopping in from the Ultimate Blog Challenge.
Happy weekend to you!
Linda Ann
Linda Ann,
Thanks for stopping by! Have a great weekend!
Reminds me of when I baked bread with my grandmother. I loved the smell of the dough. This sounds like a good excuse to go out and buy a big bucket of ice cream!
http://toninelsonmeansbusiness.com/lets-shop-savvy-saturday-3/
Toni, I like the way you think! 😉
Wow, sounds wonderful Amy, I will have to give this a try when I have a spare 5 minutes.
I like to make beer bread – it has 4 ingredients – self-rising flour, warm beer, sugar and butter. You can use any flavor beer and add anything you want from nuts and dried fruit to a chopped olive mix, make jalopena cheese bread, or anything else your imagination can conjure. and it only takes a few minutes to mix and 90 minutes to bake.
Your bread looks wonderful and I would buy your loaves if I was anywhere near Nebraska.
Julie, I’ve made that beer bread, too, and it’s delicious and makes the house smell so good, doesn’t it? Thanks so much!
Lovely! Right up my alley as well. I do a lot of artisan bread, in fact today I’m doing the 18 hour bread. Thanks for sharing!
Hooray! I’d love to hear about 18-hour bread.
If I made your bread, what would the local person I sometimes buy bread from think? (small, local farmer, too). Seriously, now I may know some of her secrets! She makes such a huge variety of breads… My stomach is rumbling over that cheese bread, although I am not a big bread eater anymore. I think that could easily be adapted for Weight Watchers. I pinned this post, too, for my Pinterest followers.
Thanks so much, Alana! Here’s what you do: buy from your local baker during farmer’s market season, and make your own during the off-season? Lots of happiness in that bread! Let me know if you give it a try!
Oh, oh, oh, Amy, you are FABULOUS!! I LOVE bread! Thank you so much for the recipe. These look delicious! I am going to give this a shot & report back!
Have a great weekend. Cheers, darlin. 🙂
Oh Shelli, thank you! Please do try this recipe out and let me know how it goes for you!
I’m drooling, I can smell that bread! Not baked bread in years – it doesn’t fit in with my chuck it in a pan and see what comes out style of cooking.
Bucket bread I can get my head around I think – and free ice-cream too. There’s my shopping list made for next week. Thanks for the recipe and the links 🙂
Enjoy your free ice cream, Jan, and then you’ll be all ready to make some fresh bread!
…there is nothing quite like home-made bread!
I agree, Caro!
I love bread and am always on the lookout for easy recipes.
Is there an alternative to using the pizza/baking stone in the oven to put the bread onto? I don’t have one 🙁 Could you just put the baking tray into the oven to heat up?
Thanks!
Tamsin,
Yes, you can put the cookie sheet in the oven instead of using the pizza stone, but you won’t get the really nice bottom crust. It’ll still be delicious though, I’m sure. 🙂 I bought a pizza stone at our thrift store for $2.00 a few weeks ago, so you might want to keep a lookout for one at a second-hand place. Many people don’t realize how handy they are.
Fabulous post, and the bread looks like it would be very tasty!! But I must confess that I use a beer bread mix to make my own bread. 🙂
Pingback: Breakfast With Jesus
THanks for the tag, Chef! I loved the post!
Amy, question…what is the whole wheat ratio in this bread to consider it (whimpy wheat) whole wheat bread? Would 2 c. whole wheat to 4 1/2 all purpose work? How many eggs for egg bread? Sorry for all the questions. I’ve made this before but, whole wheat as we know, didn’t rise very well. Tks in advance.
Rose, I think that would work. I’m not sure about your question about the eggs though. I don’t mind questions at all, but I’m not sure what you’re asking? As far as the whole wheat ratio goes, I just experiment! I know that 100% whole wheat in this bread makes a sort of flat bread that I wasn’t crazy about. I like my breads to have a nice rounded shape.
Sorry, my bad re: egg bread… I’ve been looking all over for a 1.5 gallon container and they are crazy expensive online! Your idea of ice cream containers is brillant however, I can only find 1 gallon containers of ice cream. Will a whole recipe rise all the way to the very top or will it overflow w/ the gallon one? By the way, I LOVE dipping this bread in olive oil w/ herbs, S&P etc. Restaurant style! I have always baked mine in a dutch oven but am interested to try your way! Tks!
Rose,
We can still find the 1.5 gallon ice cream buckets at the bigger grocery stores: bigger Wal-Marts and HyVees have them. That’s all I use. Although our little pizza restaurant in town will save buckets for me. Have you asked around at your restaurants?
I did it!!! I made 2 loaves!!! I made some Carrabba’s Italian EVOO dip to go with it…sooo good!! Mine weren’t as pretty as yours but I think is what happened is when I tried to score the top w/ a serrated knife, I popped it. 🙁 ah, poop) Do you use a razor to cut top? Oh well…onward, next up, olive bread! Keep giving us more!!! I want to try them all! Tks!!
Rose,
Good for you!! See how easy it is? Be sure to check out the Artisan Bread in 5 website (http://www.artisanbreadinfive.com/2014/07/28/doughnuts#more-7038) for lots more recipes and tutorials and whatnot. I use my sharpest serrated bread knife to cut the slashes in the top. You may have let yours rise too long? Just keep baking it, you’ll learn more with every batch!
Hi all, I guess you guys all have lovely American fridges! I’m writing from Britain and space is rather tight. How big is the bucket? I don’t know if I’d have the space in height even if I could make space for the circumference. Thank you in advance.
Hi Clare! The bucket is a standard 1-gallon ice cream bucket. But you can use a large bowl–or if space is especially tight, you can use any container that you can fit into the fridge. Note: The dough needs the larger bucket for the initial rise, but after it rises, then it sinks quite a bit. So after the initial rise, if you need to put it into a smaller container to fit into the ‘fridge (anything will do–I don’t know what you have available there, but I’ve used zippered freezer bags, even) you can. Just experiment until you find something that works best for you! It’s worth the trouble to have this dough in your ‘fridge, I promise!
Thank you for your reply. I have bought a container like a lunch box and the lid clips down. I underestimated how much plain flour I had in the cupboard so I’ve used about a third wholemeal flour without the sweetening ingredients I saw when I read the wholemeal loaf recipe recipe later. I suppose I need to reduce the temperature a bit and bake a bit longer. I placed the lid without clipping during the rise but I think I should have let it breathe more. Now the dough has been in the fridge for 12 hours, it doesn’t look very different now to when I put it in there. It’s filling the 5l container and the air is visible. Is it OK for the container to be airtight while it’s in the fridge?
Clare, yes, I think it’s fine for it to be airtight, as long as it has already done its rising on the counter, before putting it into the ‘fridge? It won’t rise much while it’s in there.
I have Einkorn flour but haven’t had a chance to experiment with it. Tell me more Friend!
I will be trying this soon. Although my bread machine with timer makes a decent loaf too. 🙂
I’ve just started experimenting with Einkorn myself! I’ll report on it as soon as I have some experience with it!